How to play EXVSFB on RPCS3

Requirements

RPCS3 is very CPU intensive. GPU wise any newer generation NVIDIA or AMD card will suffice.

Usually the performance of your emulator is bottle-necked by your CPU, and your CPU might go to as high as 95% utilization while in game. If you cherish your CPU life I would not recommend you to emulate any PS3 titles.

With that said, please don’t expect a full 60 FPS smooth emulation unless you have the cutting edge CPU at your expense.

Update 1/4/2020 – Newer RPCS3 versions does not rely TSX so much, so this section is now irrelevant

I would also like to point out there is a boost in performance with Intel chip-sets that have TSX instructions installed. From what I understand, most of the Intel chips released after 2014 or 2015 have this instruction installed. However, there is an exploit related to the instruction found in 2016 that can seriously compromise your computer’s security and Intel patched most of the BIOS to disable the instruction. You can look up on how to disable it, but proceed with caution.

If you really want to know if your Intel chip supports TSX, just download CPU-Z and check the instruction panel.

Some of the newer Intel chips have a newer TSX-NI technology installed, and you can see if your chip have the instruction installed from the official Intel website.

Download and Install

Download the game pkg files, preferably the Japanese Digital version
[NPJB00512]. However, If you have downloaded the Japanese Disc Version (BLJS10250 ) the game will come in a zipped file instead of PKG. Install it using File -> Add Game feature in RPCS3.

The following installation will go with NPJB00512 version of the game.

I wont post any links here, but you can find it pretty easily with google (hint: search the game code). Also, make sure you find the versions with the DLC pack included.

Download RPCS3 – Link. Any new version will work fine.

With the files downloaded, it should look like this:

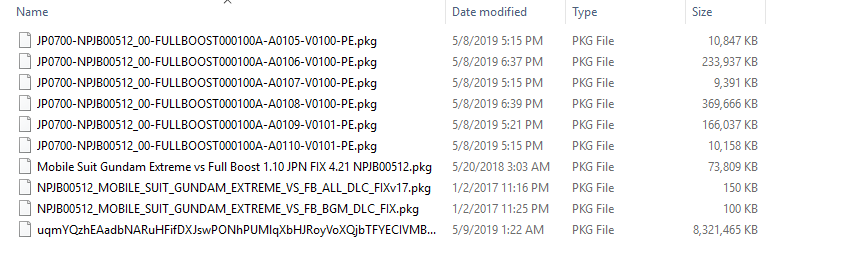
Install all the pkg files in the list, starting with the largest file (uqmYQzhE…). To install, you can just drag and drop your file into the RPCS3 and it will ask you if you want to install the pkg file. Click yes, and wait for the installation to finish (Could take up to 20 mins).

With the installation done, you can now install all the update files, starting from A0105 to A0110. After that, install the FB_ALL_DLC_FIXv17 pkg, and with that done you are good to go.

If you installed the BGM Pack, please install the fix as well.

If you installed all of the update files, your game should have version 1.10. If not, try to reinstall all the update files alongside the fix files.
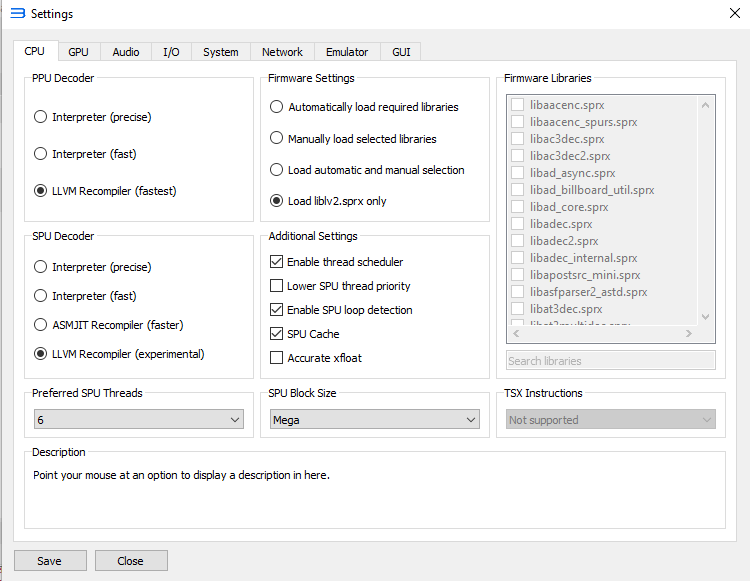
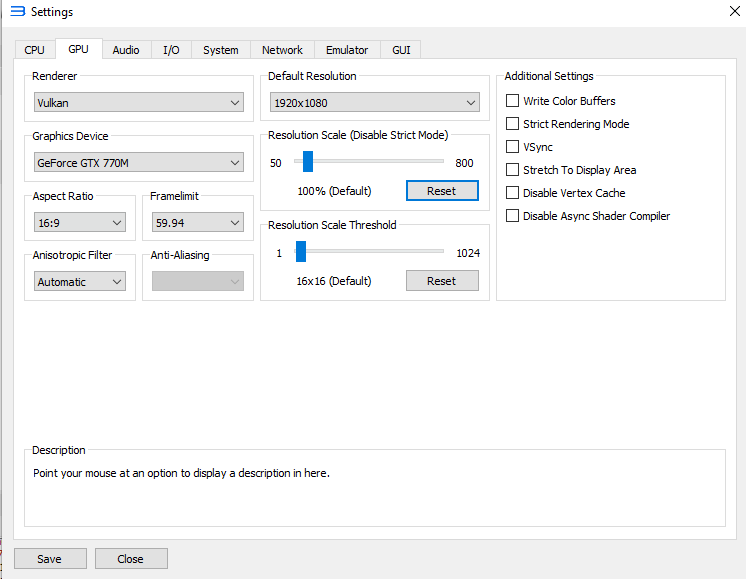
Settings

These settings screenshots were captured from RPCS3 version 0.0.6-8231.

CPU wise I would recommend getting all the fastest available options that you can get. And if your computer have TSX installed you can choose the TSX Instructions options you want.

As for GPU, always go for Vulkan, and the rest are pretty self-explanatory. GPU settings won’t affect much as you are limited by your CPU’s performance. Experiment with the settings if you feel unsatisfied.

For the sound, the crucial part is to enable Convert to 16-bit option. It can help with the buzzed sound quality you hear if you turned it off.

And with that, you are good to go!

Notes

You should see PPU initializing on your initial boot. Don’t worry, it is normal, just wait it out.

Not only that, you will encounter the same PPU initializing phase during the match loading screens. Just wait it out no matter how long it took. The emulator is trying to load the game files into cache, and it only happens when you try to load a brand new unit that you have never played before on the emulator. It will get better the longer you play the game.

That’s it! Enjoy.

And if you wish to cheat in the game or play as Boss units, just check out other posts in this site.

如何在 EXVSFB 上改机体生命,气槽,EX值

需注意事项

这教程需要已经设置完毕的 Cheat Engine,如果你还没看过之前的 Cheat Engine 设置教程,请点击下面的链接通往该教程。

Cheat Engine 设置教程

版本的不同会造成不一样的地址偏移,而这篇教程只会使用 1.10 版本的 Full Boost.

另外,RPCS3 版本不同也会造成不一样的地址偏移。我的版本是 0.0.6-7972。所以如果有出入我在这先说一声抱歉,也只能请你尽量把 RPCS3 版本带到和我差不多一样,以防止地址偏移。


解释 (建议你读一遍)

相信用过 Cheat Engine (CE) 的朋友都知道如何在一个游戏里搜寻生命值或者是武器弹数都相对的简单。当然 EXVSFB 也不列外,只要你有一个可以观察到的数值,在CE里搜寻和更改不是件难事。但是 EXVSFB 里除了弹数和生命有数值可以观察外,剩下的数值譬如气槽,EX槽则是没有游戏内数值可以参考。虽然如此,找到这些隐藏数值的地址还是有可能的,我们只需慢慢过滤一些地址直到地址里的数值会随着游戏里的数值一起变动。在我找了这么多的地址后,下面我会总结这些隐藏地址的真面目。


气槽值 – 满气槽的数值是 10000,用完气槽会使它降到 0。数值类型 – 逆向4字节

EX槽值 – 满EX槽的数值是 100, 用完EX槽会使它降到 0。数值类型 – 逆向4字节


但是这做法有一些问题,那就是这些地址不是永久的。这些地址是和关卡里的地图联系在一起的。换而言之,地图一换,地址也换。这现象也就是我们所说的地址偏移。这现象会导致我们所找的地址在完成一个关卡后便不能在下一个关卡使用,除非地图和出场的机体全部都一样。 如果过了每个关卡都需要重新寻找地址岂不是很麻烦?为了解决这一个问题,我在这篇教程中会使用字节数组搜寻的功能。但在此之前我必须谈谈 FB 系统是如何分配和管理这些机体地址的。

在 Full Boost 里,每个机体会在战斗开始后被赋予一个地址范围。这些地址范围里包含了这机体的生命值,气槽值,EX 值等等。在一个关卡里,系统也会随着场上的机体数量来分配机体的地址范围。玩家机体会被系统排在第一个,然后便是 CPU 机体了。每个机体的地址偏移都是在地址的第4和5个数字上变动。

aaaXXYYYY,XX = 机体地址偏移的数字

如果给个例子,命运 (玩家) vs ∀(CPU) 在实验地图,如果想要找命运生命值的地址,扫描后你会发现命运的地址是 341DF0164 ,而 ∀ 的生命值地址是 341E40164 。透过这两个地址我们不难看出这两者的地址差别只在地址的第4和5个数字上 。这 DF 和 E4 的排列也是证明了玩家的地址会拍在最前面,而接下来的便是 CPU 地址了 (字节排法把 DF 排在 E4 前)。

然而如果你去搜寻命运的气槽值你会发现地址是 341DF0998,而 ∀ 的气槽值地址则是 341E40998 。透过这两个地址我们也不难看出生命值,气槽值,EX槽值等等的数据的地址偏移发生在地址的最后4个数字上。

aaaXXYYYY, YYYY = 生命值,气槽值,EX槽值等等的数据地址偏移的数字

YYYY = 0000,机体地址范围的开始

YYYY = 0164,生命值 – 逆向4字节

YYYY = 0998,气槽值 – 逆向4字节

YYYY = 09D8,EX槽值 – 逆向浮游

了解完了地址配置后,我们现在就需要解决地址在每个关卡偏移的问题了。

如果拿上述的例子,把场地换成 Side 7,命运的生命地址则会变成 341E30164,而 ∀ 的生命值地址是 341E80164。这两者的地址和刚刚在实验地图的地址在 XX 上是有出入的。

解决这一个问题就得需要字节数组扫描的功能了。这功能能让 CE 随着字节排法搜寻相关的地址,而我们必须做的便是寻找可以辨别机体字节数组的地址。庆幸的是,在 YYYY = 0014,我们可以找到一个固定字节数组来辨认机体地址。

例如 命运 (341DF0014) 的24字节:

40 06 2C 00 00 00 00 01 00 00 00 01 3F 80 00 00 00 00 00 00 4F FF 2F 60

而 ∀ (341E40014) 的24字节 :

40 06 2C 00 00 00 00 01 00 00 00 01 3F 80 00 00 00 00 00 00 4F FF 2F C0

如果对比两个地址的差别,然后把差别变成 ??你会得到这组数组

40 06 2C 00 00 00 00 01 00 00 00 01 3F 80 00 00 00 00 00 00 4F FF 2F ??

但是如果你把这一组数组放进字节数组里扫描的话,你会搜寻不到任何相关地址。原因是上面两个机体例子的字节数组的差别只在最后一个字节 (C0 vs 60),但如果你去试一试不一样的机体,或者不一样的地图,你便会发现在这 24 个字节存在着不一样的差别。在我尝试了多个组合后,我得到了一个可以用在字节扫描的固定的字节数组。

40 06 ?? ?? 00 00 00 01 00 00 00 01 ?? ?? 00 00 00 00 00 ?? 4F FF ?? ??

这数组便可以被用在数组扫描里找出机体地址范围,然后把 (YYYY 换成你想要改的便可)。

虽然在每个关卡还是需要用这数组扫描的功能,但总比在每个关卡慢慢寻找相关地址来的容易。

解释完毕,我们便可以开始主教程。


主教程

寻找机体地址

这篇教程会使用 命运 vs ∀ 在实验地图,如图

进入战斗后,把你的数值类型换成字节数组

把下面这一排字节贴入数值盒子里 (请注意字节中的空格是需要的)

40 06 ?? ?? 00 00 00 01 00 00 00 01 ?? ?? 00 00 00 00 00 ?? 4F FF ?? ??

贴入后,将你的内存扫描选项换成

开始:300000000

停止:3ffffffff

换好后按下首次扫描即可。这时你的结果区域会出现一些地址,数量是随着场上的机体数量而定,而玩家本身的机体地址会是第一个。在命运 对 ∀ 的情况下,只会有两个地址,而在不同的环境下会有不同的地址,说以你所找到的地址会和我不同。如果你想知道怎么分辨请看上面的解释章节。

鼠标右击第一个地址,然后按下将选中的地址添加到地址列表。重复这动作3次。

这时你的地址列表里应该会有3个地址选项, 鼠标右击第一个然后选择更改记录 -> 地址。

在窗口开启后,把里面的地址后面4个数字改成0164,然后再把类型改成逆向4字节。

按下了确定后,回到地址列表,鼠标右击你刚刚换的地址,然后选择以十进制显示

重复同样的步骤在第二和第三个地址,只是需要换的最后4个数字可以参考下面:

生命值 – 0164, 逆向4字节

气槽值 – 0998, 逆向4字节

EX槽值 – 09D8, 逆向浮游

换好后,你便可以改变这些地址的数值,也可以激活他们来做到无限生命值/气槽值效果。

Cheat Engine RPCS3 设置

随着 RPCS3 的崛起,自然会有不少人想要使用金手指在那些单人游戏。但是如果你尝试过直接在 RPCS3 上用 Cheat Engine 扫描功能的话想必你应该遇过一些问题,譬如说你想找的地址不存在,或者地址内存的字节倒反了。基于这些原因,这教程会教你如何简单的在 Cheat Engine 上做一些调整,让你能在 RPCS3 上使用基本扫描功能。但在开始前我必须强调虽然理论上这些设置适用于每个 RPCS3 里的游戏,而我也只在 EXVSFB 上做过实践测试,所以我不敢保证不会有出入。如果你看到你的游戏金手指教程的设置和这教程有些出入,那就请你使用配合你游戏的设置。


MEM_MAPPED 设置

首先,我们必须开启 Cheat Engine 里的 MEM_MAPPED 功能。开启这一个功能的目的是为了让 Cheat Engine 有能力扫描模拟器里游戏的内存。然而如果这项功能没开,Cheat Engine 只能扫描到模拟器本身的内存,而不是游戏的内存。换而言之对我们来说是没用的。

在 Cheat Engine 里,按下编辑 -> 设置

在设置窗口弹出后,按下扫描设置。
最重要的是 MEM_PRIVATE, MEM_IMAGE 和 MEM_MAPPED 都打了勾然后按下确定, 如图


逆向字节 (Big Endian) 支持

由于模拟器的内存方式不同,如果要扫描地址普通的字节是行不通的。在大部分模拟器里都需要逆向字节才能扫描。但是在普通的 Cheat Engine 里没有逆向字节的数值类型,所以我们必须自定义新的数值类型。

在 Cheat Engine 里, 鼠标右击数值类型旁的选项,然后选择定义新的“自定义类型”(自动汇编),如图

按下过后会有一个自动汇编的窗口弹出,把里面的东西全部删了,然后把下面这些代码贴入

alloc(TypeName,256) 
alloc(ByteSize,4) 
alloc(ConvertRoutine,1024) 
alloc(ConvertBackRoutine,1024) 
alloc(UsesFloat,1)
alloc(CallMethod,1)

TypeName: 
db '逆向2字节',0 

ByteSize: 
dd 2 

//The convert routine should hold a routine that converts the data to an integer (in eax) 
//function declared as: stdcall int ConvertRoutine(unsigned char *input); 
//Note: Keep in mind that this routine can be called by multiple threads at the same time. 
ConvertRoutine: 
//jmp dllname.functionname 
[64-bit] 
//or manual: 
//parameters: (64-bit) 
//rcx=address of input 
xor eax,eax 
mov ax,[rcx] //eax now contains the bytes 'input' pointed to 
xchg ah,al //convert to big endian 

ret 
[/64-bit] 

[32-bit] 
//jmp dllname.functionname 
//or manual: 
//parameters: (32-bit) 
push ebp 
mov ebp,esp 
//[ebp+8]=input 
//example: 
mov eax,[ebp+8] //place the address that contains the bytes into eax 
mov ax,[eax] //place the bytes into eax so it's handled as a normal 4 byte value 
and eax,ffff //cleanup 
xchg ah,al //convert to big endian 

pop ebp 
ret 4 
[/32-bit] 

//The convert back routine should hold a routine that converts the given integer back to a row of bytes (e.g when the user wats to write a new value) 
//function declared as: stdcall void ConvertBackRoutine(int i, unsigned char *output); 
ConvertBackRoutine: 
//jmp dllname.functionname 
//or manual: 
[64-bit] 
//parameters: (64-bit) 
//ecx=input 
//rdx=address of output 
//example: 
xchg ch,cl //convert the little endian input into a big endian input 
mov [rdx],cx //place the integer the 4 bytes pointed to by rdx 

ret 
[/64-bit] 

[32-bit] 
//parameters: (32-bit) 
push ebp 
mov ebp,esp 
//[ebp+8]=input 
//[ebp+c]=address of output 
//example: 
push eax 
push ebx 
mov eax,[ebp+8] //load the value into eax 
mov ebx,[ebp+c] //load the address into ebx 

//convert the value to big endian 
xchg ah,al 

mov [ebx],ax //write the value into the address 
pop ebx 
pop eax 

pop ebp 
ret 8 
[/32-bit] 

贴入过后,你的自动汇编应该会和下面的图片内容一样。核对了过后便可按下确定

按下确定了过后,你便会发现数值类型里会多了一个逆向2字节的选项,如图

接下来我们用一样的方式把逆向4字节加入数值类型里。

alloc(TypeName,256) 
alloc(ByteSize,4) 
alloc(ConvertRoutine,1024) 
alloc(ConvertBackRoutine,1024) 
alloc(UsesFloat,1)
alloc(CallMethod,1)

TypeName: 
db '逆向4字节',0 

ByteSize: 
dd 4 

//The convert routine should hold a routine that converts the data to an integer (in eax) 
//function declared as: stdcall int ConvertRoutine(unsigned char *input); 
//Note: Keep in mind that this routine can be called by multiple threads at the same time. 
ConvertRoutine: 
//jmp dllname.functionname 
[64-bit] 
//or manual: 
//parameters: (64-bit) 
//rcx=address of input 
xor eax,eax 
mov eax,[rcx] //eax now contains the bytes 'input' pointed to 
bswap eax //convert to big endian 

ret 
[/64-bit] 

[32-bit] 
//jmp dllname.functionname 
//or manual: 
//parameters: (32-bit) 
push ebp 
mov ebp,esp 
//[ebp+8]=input 
//example: 
mov eax,[ebp+8] //place the address that contains the bytes into eax 
mov eax,[eax] //place the bytes into eax so it's handled as a normal 4 byte value 

bswap eax 

pop ebp 
ret 4 
[/32-bit] 

//The convert back routine should hold a routine that converts the given integer back to a row of bytes (e.g when the user wats to write a new value) 
//function declared as: stdcall void ConvertBackRoutine(int i, unsigned char *output); 
ConvertBackRoutine: 
//jmp dllname.functionname 
//or manual: 
[64-bit] 
//parameters: (64-bit) 
//ecx=input 
//rdx=address of output 
//example: 
bswap ecx //convert the little endian input into a big endian input 
mov [rdx],ecx //place the integer the 4 bytes pointed to by rdx 

ret 
[/64-bit] 

[32-bit] 
//parameters: (32-bit) 
push ebp 
mov ebp,esp 
//[ebp+8]=input 
//[ebp+c]=address of output 
//example: 
push eax 
push ebx 
mov eax,[ebp+8] //load the value into eax 
mov ebx,[ebp+c] //load the address into ebx 

//convert the value to big endian 
bswap eax 

mov [ebx],eax //write the value into the address 
pop ebx 
pop eax 

pop ebp 
ret 8 
[/32-bit] 

按下确定了过后,在用一样的方式把逆向浮游加入数值类型里 。

alloc(TypeName,256) 
alloc(ByteSize,4) 
alloc(ConvertRoutine,1024) 
alloc(ConvertBackRoutine,1024) 
alloc(UsesFloat,4)
alloc(CallMethod,1)

TypeName: 
db '逆向浮游',0 
ByteSize: 
dd 4 
UsesFloat:
db 01

ConvertRoutine: 
[32-bit] 
push ebp 
mov ebp,esp 
mov eax,[ebp+8] //place the address that contains the bytes into eax 
mov eax,[eax]   //place the bytes into eax 
bswap eax 
pop ebp 
ret 4 
[/32-bit] 

[64-bit] 
//rcx=address of input 
mov eax,[rcx] //eax now contains the bytes 'input' pointed to 
bswap eax 
ret 
[/64-bit] 

ConvertBackRoutine: 
[32-bit] 
push ebp 
mov ebp,esp 
//[ebp+8]=input 
//[ebp+c]=address of output 
push eax 
push ebx 
mov eax,[ebp+8] //load the value into eax 
mov ebx,[ebp+c] //load the address into ebx 
bswap eax 
mov [ebx],eax //write the value into the address 
pop ebx 
pop eax 

pop ebp 
ret 8 
[/32-bit] 

[64-bit] 
//ecx=input 
//rdx=address of output 
bswap ecx 
mov [rdx],ecx //place the integer the 4 bytes pointed to by rdx 
ret 
[/64-bit]

按下确定了过后,简单的设置就完成了!

你的数值类型应该会有3个新的选项

下一次扫描 RPCS3 游戏里的数据时,你便可以用逆向字节或逆向浮游。

接下来我们将会实践扫描 EXVSFB 里的数值,开启无限生命值等等。

Intro

Not a native English speaker, so broken English all around.

I figured out this blog will be a good way for me to document all the process I have made in my journey to find cheats in exvsfb on the RPCS3 emulator

Inspiration

My desire to cheat in exvsfb can be all credited to this video:

This video is actually a play through of a particularly famous stage in exvsmb, also known as A3-EX. It is a boss fight stage featuring Arthun Zala and its Infinite Justice + Meteor Pack. This Combo inspired me to find out why FA Unicorn was able to do so many hits on the Infinite Justice without bringing it to a “down” state. As it turns out, every unit in the game has a value called “down value”, and it determines the threshold value for the unit before it goes into a “down” state. In the aforementioned A3-EX stage, the Infinite Justice has a down value of 20, instead of 5 on a normal unit.

Seeing how cool the combo was, I started to search if there is any enemy in EXVSFB that has the same down value as the Infinite Justice. Spoiler alert, there is no one. Bandai kept all the fun on the arcade side, and Japanese players just keep torturing us with new videos on the stage.

Enraged by this, I decided to see if I can change the down value of a unit in PS3. Turns out, you need to use a cracked PS3 in order to cheat the game, which I refused to do so to retain my ability to play online. With no other option, I can only wait.

And waited for 5 years I did. I have been following PS3 emulation for few years now, and I am hesistant to try it out as I tought my old spec is not enough to run the game. But curiosity got the best of me and I still eventually tried it out. Surprisingly my old laptop can run it, albeit on a slow side. But achieving 60 fps on 1v1 is not a problem.

With this in mind, I had an idea. How about I use cheat engine on it and try to change the down value? And I started experimenting, I found some interesting stuff, and I decided to share.

Design a site like this with WordPress.com
Get started