Encoding .bnsf / .is14 audio files is possible. But I would like to note that the game I am modding is not GE2RB.
To encode your .bnsf / .is14 audio files, you would first need to identify what is the exact codec that your game files use.
Download Foobar2000, install the vgmstream component, and add the audio files into it (make sure your audio has .bnsf / .is14 header and is not a raw audio stream).
Red = BNSF headers, Green = Raw audio stream.
If the added audio can be played in foobar2000, it means that the headers are correct. You may proceed to check the codec by right clicking the audio files, select properties and navigate to Details tab. Under the Details tab you should see the codec as such:
In this case, the Codec is G.722.1 annex C. Please remember the exact name of this codec as any deviation in version or annexes will result in different encoding.
Search for your G.722.1 codec version, and read the red fine print to know the annex version. G.722.1 annex C is included in G.722.1 (05/05), with annex C implemented in the Fixed 14kHz mode.
The file you download from here is the source code for both the encoder and decoder. To obtain the .exe files, you would need to compile it using Visual Studio.
Since annex C is implemented in Fixed mode, we are going to use Fixed encoding.
Go to the encode folder, you should see these files.
encode.dsw is the project file you are looking for. Try to open it in Visual Studio 2019, and it would prompt you with a VS version migration.
However, I encountered 3 errors when migrating the solution:
If “‘/ZI’ and ‘/Gy-‘ command-line options are incompatible” error shows up: -Debug -> encode properties -C/C++ -> General -> Debug Information Format -> Change to Program Database (/Zi) -Rebuild Solution
If “C7231 redefinition” error shows up -Rename the error name into something else (use VS own rename option). -Apply rename to all files -Rebuild Solution
You would also need to extract the files in stl-files.zip in the common folder, or VS would not be able to open these files.
If there are no more errors you may proceed to rebuild the solution and the .exe should be inside the debug folder.
Now let’s prepare the .wav files. There are two ways to approach this, either by using ffmpeg or by just using a hex editor. What we want to achieve here is to remove the RIFFWave header from .wav files, and save the raw audio stream data as .pcm format.
Red = .wav header. Green = .wav audio stream
Using a hex editor such as HxD can easily remove the header bytes from the file, but be careful on removing too much or too few bytes as it can cause Encoding issues.
Using ffmpeg is a safer choice. Download ffmpeg, open your command prompt and navigate to ffmpeg bin folder. Now place your .wav files inside the bin folder, and in the command prompt use this command:
Rename the filename to the .wav filename you have, and run the command. You should see a .pcm file created in the bin folder.
Copy this .pcm file back to the encoder debug folder, and navigate your command prompt to the debug folder. Use this command to convert the .pcm to .bnsf
encode 0 filename.pcm filename.bnsf 48000 14000
Please do not change the 0 in the command. If your codec is G.722.1 without annex C, please use 7000 instead of 14000. 48000 is the bit rate, please experiment with it until you get the desired result.
Now you should see a bnsf file is created in the debug folder. This is the encoded bnsf audio stream without the bnsf header. You would need to add the header back yourself using memory editor. Here are some parameters that you should change in a bnsf header.
1 = The total file size in hex minus 0x08. E.g. Total file size = 0x5670 – 0x08 = 0x5668
2 = The sample size of the audio in hex (check in the original wav file before conversion)
117760 in Decimal = 0x001CC00
3 = The file size of the audio stream. Total file size minus header size (0x30) E.g. Total file size = 0x5670 – 0x30 = 0x5640
With that done, put your modified file into foobar2000 again to check if the audio file can be played. If yes, congratulations.
これを実行すると、結果セクションにメモリアドレスのリストが表示されます。 各アドレスを1つず調べるにはまだ早すぎますので、さらにフィルタリングしてみましょう。 通常、Scan Type を Unchanged Value に変更して次のスキャンを実行することをお勧めしますが、高度を維持せずに地面に落ちるため(ブーストを補充します)、Changed Value そのままにして、ブーストが補充された後に Next Scan をクリックします(フルブーストゲージと以前に使用したブーストゲージ値を比較します)。
I will be dumping all the knowledge I learned from modding the game in RPCS3 here.
What is Cheat Engine and what does it do
Cheat Engine is a free Memory scanner / Hex editor / debugger created by Eric Heijnen.
What it does basically is allow us to look in the memory of a program, and to some extend, examine the code behind it. Also, it allows us to search for specific memories that we want to edit.
How does a computer store data (memory)
You already know that computer are made up from a bunch of 0’s and 1’s. But how are these 0 and 1 are stored in the memory? The answer is that the computer combines 8 of these 0 and 1 to become a byte, which is in hexadecimal.
Easiest way for you to understand this is by using the calculator in windows 10 and change it into programmer mode, where you can see a bunch of different options. The top is Hex, representing Hexadecimal values (00 to FF), second one is Dec, representing Decimal values (normal digits), and the last one is Bin, representing Binary values (0 and 1).
For example in a game where your health point is currently 60, it will be shown in the memory as 3C in hexadecimal form. As for the Binary values, it is not important for now, but keep it at the back of your head.
Byte, 2 bytes and 4 bytes
A byte consists of two digits, with the first digit representing the first 4 binary and the second digit representing the last 4. For example, in the last example the 3 in the 3C is represented by 0011 in Binary, and C is represented by 1100 in Binary.
One digit of byte ranges from 0 to 9 and after exceeding 9 it will continue from A to F. Hence, the maximum possible value for one byte is FF, which is 255 in decimal. Now, what if I want to store a number greater than 255? The answer is that you can do this by attaching another byte to the side of the first byte, making it a 2 byte. For example, 256 is shown as 01 00, and there are 16 binary digits, each 8 digits representing one byte. (The 0 in 01 is not shown in calculators)
Following the same logic, the maximum value you can store for 2 bytes are FF FF, or 65,535, and the maximum for 4 bytes are FF FF FF FF, or 4,294,967,295 (7F FF FF FF in some cases).
If you count the number of digits in Binary of 4 bytes, you will get 32 digits. Here’s where the 32-bit system on your computer comes from. In a similar vein, 64-bit system uses a 8 byte system.
While RPCS3 is a 64-bit application, it is trying to “emulate” a PS3, which runs a 32-bit system, and thus the bytes in the games are stored in 4 bytes. Hence, most of the data in the game are stored in 4 bytes system.
The above is an example of how memory is presented in the memory viewer in the Cheat Engine. As you can see, the health for my unit is currently at 60, which is 00 00 00 3C in the system.
Floats and decimals
So we have introduced the “normal” values. What if the systems want to use decimal points in their value? The answer to that is float.
In the Windows 10 calculator, it is not possible to convert hex into float, so we will have to use external programs or websites to do it. Here’s one float to hex converter I always use: https://gregstoll.com/~gregstoll/floattohex/
There’s not much to say about float other than the fact that it is always 4 byte long. Here I will list down the most common float numbers I see in the game memory:
1.00 – 3F 80 00 00
1.50 – 3F C0 00 00
2.00 – 40 00 00 00
50.00 – 42 48 00 00
100.00 – 42 C8 00 00
The easiest example of float usage in the game that I could think of is the EX Gauge values. At 50.00, the gauge is half full, and at 100.00 (42 C8 00 00), the gauge is full.
Floats vs values
You might be confused as to why 3F 80 00 00 is not treated as 1,065,353,216, but 1.00. The only answer I can give you is that it is just what the system knows beforehand. It is impossible to know if the 4 byte is a value or a float right away, and the only way to test it is to actually edit the value and see if the system freaks out in some way. However, usually we won’t use the weird value of 1,065,353,216, so it might be a giveaway that the 4 byte is a float value if you see an 3F or 40 at the first byte.
Big Endian and Small Endian
Most of the time, emulators are in Big Endian. I don’t know the specifics of why this is the case, but the concept of Endianess are easy to grasp. Basically think of it as reading from left to right or right to left. Difference in small and big endians are the way the bytes are arranged, and to convert between them, you will just have to swap the positions of the bytes.
So for example we have a value of 10,000 in our game, and it is represented by 00 00 27 10 in 4 byte hex. Since RPCS3 is in Big Endian, to convert it into small endian it would be 10 27 00 00 instead. See how the byte position are swapped? It would mean a different value if you interpret Big Endian values as Small Endian, which in this case turns 10,000 (00 00 27 10) into 270,991,360 (10 27 00 00).
But how does this affects the memory edits? Since Cheat Engine supports Small Endian by default, you need to add a new custom type of value type into Cheat Engine before you can start searching for values inside the game. Please follow this tutorial for the setups. Also, if you want to use LUA functions, it will always returns in small endian, which might be problematic since you will need to convert it back and forth. Moreover, in earlier versions of RPCS3 it will be a pain in the ass to look through the memory viewer in Cheat Engine since all the bytes are arranged in small endian and all of the byte positions are swapped. However, this is not the case for later versions of RPCS3, namely 0.0.6 onward, as it is shown in the correct endianess in the memory viewer, but I have no idea why (the screenshots in this tutorial are all done in 0.0.6-8231).
Memory address
With value types and endianess out of the way, I will now explain how memory are indexed.
Memory address, as its name suggests, is the address value assigned for each byte in your memory. Think of a byte as a house, each with an address attached to it. The addresses are hexadecimal in nature.
Back to the health example from above, take a look at the left side of the memory viewer, 341DF0164. That is the address of the first byte, which is 00. Here’s the memory address for each byte:
341DF0164 – 00
341DF0165 – 00
341DF0166 – 00
341DF0167 – 3C
And by that, the next byte 341DF0168 will be the new starting byte for the second 4 byte.
Simple enough, right? Here’s the difficult part: Searching for the right address. You might have noticed the health value only occupies the memory region of 341DF0164 to 341DF0167, a mere 4 byte in a 9 digit large hex address. This means that the greatest challenge is to search for the relevant addresses that we want, and it is not easy.
Fortunately we have Cheat Engine’s search function, which is the essential step before for any memory editing to be done.
Difference between real PS3 and RPCS3
Before I go into the detail of searches, I would like to explain some differences in memory addresses between PS3 and RPCS3. In PS3, the system allocates a region of memory for the game to store information, and the memory address are usually 4 bytes (8 digits) hexadecimal values. In RPCS3 however, since the system is trying to emulate a PS3, it shifts the whole memory region under a larger memory address, consisting of 9 digits. I will refer this as the “emulator offset” from now on.
It might sound confusing, so let me give you an example. Here, let’s get Whitelord’s selecting Boss CPU cheat code developed originally for the PS3:
ARCADE/MS MODE BOSS SELECTOR 00002000 40AF402C 000138D1
00002000 = Write the specified byte at the specified memory address
40AF402C = The memory address to be written into
000138D1 = The byte to write
This line of code is trying to write the value of 000138D1 to the memory address of 40AF402C, in order to swap out EX-S with Destroy Gundam.
In RPCS3 however, if we try to modify the value at the 40AF402C address, it will not work. In RPCS3, the system actually shifts the 40AF402C address by 300000000, which when combined will become 340AF402C. 340AF402C is the address of EX-S, which is what we wanted to modify. You may notice that the 40AF402C part of the address remains unchanged, because RPCS3 is essentially “dumping” the PS3 allocated memory address to another bigger playground so that it can emulate the console better. This is why RPCS3 memory addresses are 9 digits long while PS3 are 8 digits long. This is super important to pointers, which I will get into in the advanced modding tutorial.
Also, this is the reason why you would see my range of searches to be fixed from 300000000 to 3FFFFFFFF throughout the tutorials, since the relevant data we need are all in this memory region.
Searching for memory addresses
Before you start to search anything in RPCS3, make sure you already followed the basic setup outlined in the tutorial here. Also, you will need to hook the Cheat Engine with the RPCS3 process every time you start the game or Cheat Engine.
Searching for memory addresses, is essentially a filter process. By providing the condition you want, you can let Cheat Engine do the search on the memory to search for the relevant memory addresses you want, and filter out the memory address that holds the incorrect value as per your condition, rinse and repeat until you get the address that you want.
I don’t think I need to teach how to search for values that you can already see such as health bar or ammo. There are plenty of online basic tutorial out there and there’s a built in tutorial in Cheat Engine to get you started. What I want to focus on here is on the Unknown values and Array of Byte searches.
Unknown values
I will use boost gauge as an example in this section. Since we only have a visual representation of a gauge instead of values, and we don’t know the initial value of the gauge, we can only search for the values we want using unknown initial value searching.
Set up the Cheat Engine like this, the most important part is to Change the Scan Type to Unknown Initial value and 4 Byte Big Endian. How do we know the boost is a value not a float? The answer is we don’t know, we will just have to guess, and I will go with 4 Byte Big Endian this time. Pause the game while scanning is optional, but it allows us to freeze the game while the Cheat Engine is doing the scanning process. Also, You don’t have to use 300000000 and 3FFFFFFFF for Start and Stop, I just used it because I know the memory address I want falls in that region (look at the above section), and this speeds up my search a lot.
With that done, please make sure that your boost gauge is full and press on the First Scan button.
Once it is done, you should see that it Found a ton of addresses. This is Cheat Engine indexing all of the values in the memory region and storing it for future comparison.
Now let’s try to filter it down to just 2 or 3 addresses by using Next Scan.
There are quite a few options to be chosen from the scan type after you have done your first scan, and there are here to help you filter out the memory addresses. All of these are pretty self-explanatory, so I will just go with the most generic one, Changed Value.
As it’s name implies, the options searches for memory addresses that has their values changed when compared to the first scan. Now try to use some of your boost, and before it replenishes click on the Next Scan button (you want to check if any values are changed when compared with the full boost gauge from the initial scan).
Once you have done that, you will see a list of memory addresses popping up in the results section. It is still too early to see each address one by one, so let’s just filter more out. Usually I would suggest you to Change the Scan Type to Unchanged Value and do the next scan, but since you won’t be maintaining the altitude and will be falling to the ground (which will replenish your boost), I would suggest you remain the Changed Value and click on the next scan after your boost have been replenished (compare between full boost gauge with the previous used boost gauge value).
When you are done with it, there should still be a ton of addresses left. Now change your Scan Type to Unchanged Value, and without using any boost gauge value, press the Next Scan button.
Since you have not used your boost since your last Changed Value filter, any memory address with changed value will be filtered out using the Unchanged Value option. You should see that the number of addresses found diminishes quickly. Here’s a tip to Unchanged Value scan, you can spam the Unchanged Value next scan provided you don’t change the value in any way. This will filter out most of the false addresses that changes even if you did not change your value (Boost Gauge value in this case).
Another tip is do some actions that does not change your boost gauge value while spamming the Unchanged Value Scan, such as walking or shooting. This will greatly decrease your number of Found addresses, since doing actions like this changes a lot of values.
Now that I have lowered the addresses Found to just 32,324 by using Unchanged Value. The number could not be lowered anymore, so it is time to revert back to Changed Value. Now you can see the overall pattern of this: Changed and Unchanged scans. By doing enough iterations of these, you should be able to reduce the number by 2 digits. In my case I lowered it to just only 20 memory address.
Now all these 20 memory address are related to the boost gauge value. How do we determine which one is the true address for it? Answer: Hunch and trial and error. Usually I would look for some reasonable values like 100 or 50 or 1, which I would then observe each one and see if the value changes depending on what I do. For this case, my prime suspect is the 10000, since it decreases when I use the boost gauge, and became 0 when I depleted it. Also it being a round 10,000 makes sense in gaming. However, there are two addresses with the value of 10,000. Which one should I choose? Answer: Why not both?
Now, I added both of these values into the Cheat Table below. The easiest way to check if the memory address is correct is to freeze (Active) the value on the memory address by checking the box on the left.
First I tried on Suspect 1, by freezing the value and try to fly up. Unfortunately, the value still decreases, which means that this is not the one.
Then I moved on to Suspect 2, and it worked! Infinite Boost!
Now before we go parade I just wanted to point out there’s actually a third suspect in the memory list, which is the first address.
You might recall that floats are basically 4 bytes too right? Since Cheat Engine has no way to differentiate between a 4 byte value and float value, usually 4 byte scans will include some float values in it and vice versa. The easiest way to recognize this is to change the entire list to Float, and you would see that the first value is actually a Float 1.00 value. Fortunately it is not the memory addresses we wanted, or else we might had completely missed it.
This tutorial will use 1.10 version of the game, and will not work on other versions.
Aside from that, please make sure that you are using is the latest version of RPCS3, or have a version close to what I used (0.0.6-7972). Older versions of the emulator will too cause offsets in the game’s memory address.
Apart from that, this trainer only works on Cheat Engine version 6.8.3 or newer.
So in the last tutorial I spoke about the limitations for the method we used in finding those addresses, which is the fact that the addresses that we found changes for each stage. And in order to combat this, I created a Trainer to be used on the game which can automatically scan for any changes in the address, allowing you to retain your modified properties across stages.
This trainer is created using Cheat Engine’s built in Trainer maker, using LUA script. Basically, I just automated all the search process that I detailed in the tutorial above, and added in a looped timer to check if the stage has changed. If the stage has changed, it will automatically update your unit’s address.
After you have downloaded it, just open the trainer like a normal file. You will need to have Cheat Engine 6.8.3 or newer installed before you can use this trainer.
First, press on the Connect RPCS3 button when you start the game. If the attaching process is unsuccessful, please make sure that your emulator is running with the process name “rpcs3.exe”.
Now go in any game mode you want, and proceed to start a battle. While in battle, you have two options, either let the trainer do the refreshing job automatically for you, or manually refresh your address for each stage.
To do the former, choose the game mode that you are in, and check the Enable Auto-Refresh option. With this done, the trainer will start to scan for units on the field automatically, until it finds some value. If it fails, please make sure that you are in a battle or use the correct versions as detailed above. If you don’t want to use the Auto-Refresh option, just leave the Auto-Refresh option unchecked and press on the Refresh Address manually for each stage.
After you have found addresses for the units on the battlefield, you can now proceed to select a unit from the Selected Unit option, and change the unit’s attribute from there. To change a value, simply replace the numbers in the value box and press confirm. If you want to have Infinite value, just tick on the Activate option below.
Future
There are ways to make this trainer more interesting, such as adding a hotkey functionality to the trainer. I will list down the things that I hope I can put in the trainer in the future, but no guarantees.
-Add hotkey functionality for DS4 controllers (please download XInput yourself)
-Add in more attributes, such as Red Lock Range, weapon ammo and reload time
This tutorial will use 1.10 version of the game, and will not work on other versions.
Aside from that, please make sure that you are using is the latest version of RPCS3, or have a version close to what I used (0.0.6-7972). Older versions of the emulator will too cause offsets in the game’s memory address.
How it works (You can skip this)
I believe that anyone who have used Cheat Engine in the past will have a basic understanding on how to search for a value in games. Well, it is not much different in this game. If you have a value that is easily observable (e.g. health, ammo), you can find and change it in Cheat Engine with ease. However, apart from health and ammo, other values in the game such as EX or Boost are represented by a gauge, which their real value is hard to determine . The only way to discover these values are through changed / unchanged scans in Cheat Engine to single out the correct address. With that said, I will conclude my findings on how the hidden value behaves in the game down below.
Boost Gauge Value – Full Boost gauge value is 10000. It will be empty when it reaches 0. Value Type – 4 byte big endian.
EX Gauge Value – Full EX Gauge value is 100. It will be empty when it reaches 0. Value Type – Float big endian
However, there is one problem with the address that I found. These addresses are not permanent, and instead they relies on the scenario of the battle. Any changes to the stage (map) or the controlling unit in the game will cause the address to shift. To combat this, I initially tried finding pointers in the game, but proved futile when there is no way for Cheat Engine to read pointer values in big endian. Hence, I resorted to Array of byte (AoB) scans, which in simpler terms, search for a byte arrangement in the game, which we can use in this situation. Before I delve deep into the AoB shenanigans, I would like to explain how the game control and manage these addresses.
So in Full Boost, every unit will be given a range of addresses that stores their information in battle. In every battle, the system will allocate each unit with a set of addresses depending on the number of units currently on the stage. Fortunately the system will always allocate the player’s address first, before moving on to others. With that, we can easily determine which address are ours, and which addresses are for the CPUs.
Now lets talk about the shift in address that previously mentioned. In the game, when the system allocate address to a unit, it usually comes in the form like this:
341DF0000 – 1st unit
341E40000 – 2nd unit
What I found is that the 4th and 5th digit of the address will shift for each unit on the battle, and the last 4 digits are shifted to represent a specific properties of the unit, thus giving a “range” to these addresses.
For example, I will use Destiny Gundam (Player) vs Turn A (CPU) in testing map. If you search for Destiny’s health, the address you found will be 341DF0164, while Turn A’s address to be 341E40164. As for the boost value addresses, it is found out to be 341DF0998 and 341E409D8 for Destiny and Turn A respectively. We can generalize the address format as such:
aaaXXYYYY, XX = Shift (Offset) for unit & stage; YYYY = Shift (Offset) for different properties
YYYY = 0000, starting point for the address range
YYYY = 0164, Health – 4 byte big endian
YYYY = 0998, Boost – 4 byte big endian
YYYY = 09D8, EX – Float big endian
With that done, we can move toward stage offsets. In this case, those XX in the address will also shift depending on the stages. If I change the current map to Side 7, the health address for Destiny Gundam will be 341E30164, and 341E80164 for Turn A. Hence, it can be concluded the XX in the address depends on two factors, and will be unique for each stage unless you use the same unit and map, which is not possible given the nature of arcade and FB mission mode.
So to solve this problem, we will employ the use of AoB scans. Before we use the scan however, we need to find a combination of byte arrangement that will exist in all the address range. Fortunately, not far from the start of the address range at YYYY = 0014, I found an array of byte that is present in all the unit offset address.
The 24 bytes YY = 0014 (341DF0014) for Destiny Gundam:
Now you might ask, isn’t there a difference in the last byte? This is where the wildcard byte comes in. To allow more usage flexibility, AoB scans have the wildcard function where you can replace bytes in the array, and the wildcard byte can be anything in the byte array. In this case, we will replace the last byte with *, and as long as the byte arrangement in front (non-wildcard bytes) are the same, the AoB scan will still be able to locate the byte array.
However when you try to scan the byte array above, you might have gotten 0 results. Why you ask? It is because one example is not enough to determine which byte is changing. If I changed the stage or unit combinations, I will get different results for the byte array. So now I just have to replace those changing bytes with wildcards and we are good to go!
Just a side note I would like to add is that too many wildcards in an AoB scan might result you with false positives, so try to strike a balance between identifiability and exclusivity while choosing your byte array. Conversely, if you chose a very generic byte array you might find more results that you don’t want.
Now with the byte array ready, we can put it into the search bar and start to scan it. You can then replace the YYYY value of the address you found to the properties that you like to modify.
Unfortunately you still need to repeat the scan process for each stage, but it is still better than trying to find the values manually without AoB.
Phew, that’s a lot of stuff. Now lets get you to the main tutorial.
Main tutorial
Finding the address that controls your unit
To serve as an example, I will use Destiny vs Turn A in this tutorial. This is applicable with other units but please bear in mind the address that you found will not be the same as mine. Also, I am using the testing map.
Once you are in the battle, get back to Cheat Engine and select Array of byte as your Value Type.
Copy and paste the following bytes into the search bar (The space between the bytes are crucial)
[Optional] After you have pasted it, change your Memory scan option’s start and end address to the following:
Start:300000000
Stop:3ffffffff
If you cannot find any address, consider skipping this step.
With that said, proceed to press the First Scan button and wait for a few seconds. There should be some results on your left. The number of address found correlates with the number of units that are present on the field (there might be exceptions). In the case of Destiny vs Turn A, there will only be two results. The address that you found will be different for different scenarios, and if you are curious on how to differentiate it you can check the explanation chapter above.
Right click on the first address, and select “Add selected address to address list”
这时你的地址列表里应该会有3个地址选项, 鼠标右击第一个然后选择更改记录 -> 地址。
Now, navigate down to the address list down below and you should find three addresses added. Right click on the first address and select Change record > Address.
在窗口开启后,把里面的地址后面4个数字改成0164,然后再把类型改成逆向4字节。
Replace the last 4 digits of your address to 0164, and change the value type to 4 byte big endian.
按下了确定后,回到地址列表,鼠标右击你刚刚换的地址,然后选择以十进制显示
Once you have done that, right click on the address that you have changed and select Show as decimal. You now should see your health.
重复同样的步骤在第二和第三个地址,只是需要换的最后4个数字可以参考下面:
The steps above are for your health value. To find your boost and EX gauge values, just repeat the same steps but change the last 4 digits of your address and the value type as follow:
Health – 0164, 4 byte big endian
Boost Gauge – 0998, 4 byte big endian
EX Gauge – 09D8, Float big endian
And voila! You can now change your health, boost or EX values!
However, please be reminded that this will only work for the current stage. If you changed your stage, you need to do the steps above all over again.
If you feel doing the same steps for every stage is tedious, you can try the trainer that I have made that lets you retain the values that you set from the previous battle. I will explain this in detail in the future.
To use Cheat Engine on RPCS3, you need to set up a few things beforehand.
MEM_MAPPED Settings
First, we need to enable MEM_MAPPED option to let Cheat Engine have the ability to scan Mapped memory regions. As most of the games emulated are stored in mapped regions, this option is essential for using Cheat Engine in emulators.
In Cheat Engine, go to Edit -> Settings.
Navigate to the Scan Settings tab, and ensure that all three MEM options are enabled, as shown in the figure below.
Big Endian Support
Most emulators operates in Big Endian value type. To put it simply, Big Endian is the reversal of a normal byte array. For example, 00 01 02 03 in Big Endian will be 03 02 01 00. By default cheat engine does not include Big Endian value type, so we will need to define it ourselves.
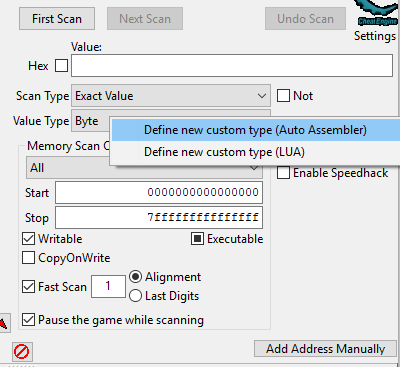
In cheat engine, right click on the value type and select Define new custom type (Auto Assembler).
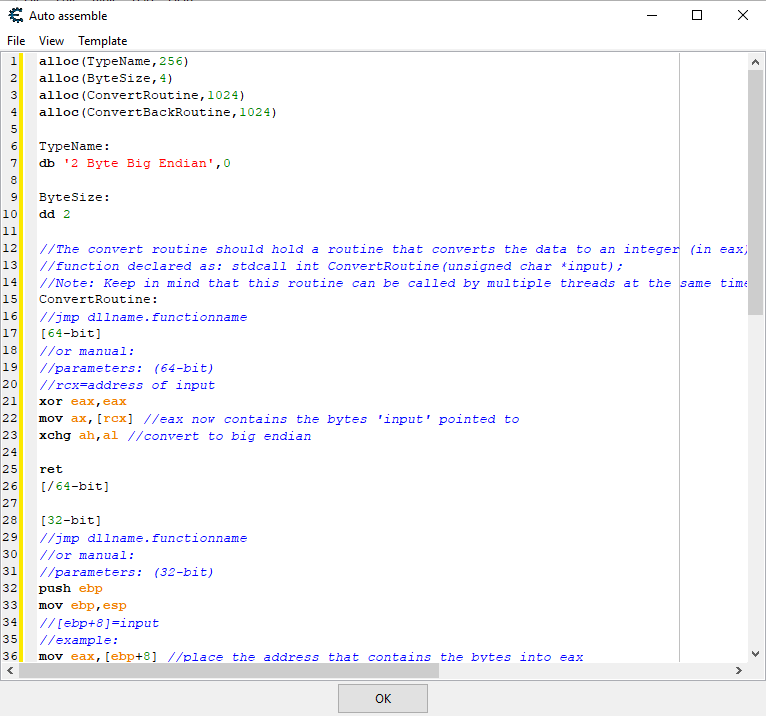
A new window will pop up with codes in it. Delete it all and paste in the codes down below.
alloc(TypeName,256)
alloc(ByteSize,4)
alloc(ConvertRoutine,1024)
alloc(ConvertBackRoutine,1024)
alloc(UsesFloat,1)
alloc(CallMethod,1)

TypeName:
db '2 Byte Big Endian',0

ByteSize:
dd 2

//The convert routine should hold a routine that converts the data to an integer (in eax)
//function declared as: stdcall int ConvertRoutine(unsigned char *input);
//Note: Keep in mind that this routine can be called by multiple threads at the same time.
ConvertRoutine:
//jmp dllname.functionname
[64-bit]
//or manual:
//parameters: (64-bit)
//rcx=address of input
xor eax,eax
mov ax,[rcx] //eax now contains the bytes 'input' pointed to
xchg ah,al //convert to big endian

ret
[/64-bit]

[32-bit]
//jmp dllname.functionname
//or manual:
//parameters: (32-bit)
push ebp
mov ebp,esp
//[ebp+8]=input
//example:
mov eax,[ebp+8] //place the address that contains the bytes into eax
mov ax,[eax] //place the bytes into eax so it's handled as a normal 4 byte value
and eax,ffff //cleanup
xchg ah,al //convert to big endian

pop ebp
ret 4
[/32-bit]

//The convert back routine should hold a routine that converts the given integer back to a row of bytes (e.g when the user wats to write a new value)
//function declared as: stdcall void ConvertBackRoutine(int i, unsigned char *output);
ConvertBackRoutine:
//jmp dllname.functionname
//or manual:
[64-bit]
//parameters: (64-bit)
//ecx=input
//rdx=address of output
//example:
xchg ch,cl //convert the little endian input into a big endian input
mov [rdx],cx //place the integer the 4 bytes pointed to by rdx

ret
[/64-bit]

[32-bit]
//parameters: (32-bit)
push ebp
mov ebp,esp
//[ebp+8]=input
//[ebp+c]=address of output
//example:
push eax
push ebx
mov eax,[ebp+8] //load the value into eax
mov ebx,[ebp+c] //load the address into ebx

//convert the value to big endian
xchg ah,al

mov [ebx],ax //write the value into the address
pop ebx
pop eax

pop ebp
ret 8
[/32-bit]
Once you have pasted it in, double check the script, and press OK
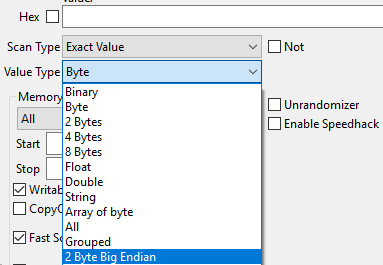
After that, the value type you defined will be added in the value type selection, as shown below.
Using the same method, add in the 4 byte Big Endian value type.
alloc(TypeName,256)
alloc(ByteSize,4)
alloc(ConvertRoutine,1024)
alloc(ConvertBackRoutine,1024)
alloc(UsesFloat,1)
alloc(CallMethod,1)

TypeName:
db '4 Byte Big Endian',0

ByteSize:
dd 4

//The convert routine should hold a routine that converts the data to an integer (in eax)
//function declared as: stdcall int ConvertRoutine(unsigned char *input);
//Note: Keep in mind that this routine can be called by multiple threads at the same time.
ConvertRoutine:
//jmp dllname.functionname
[64-bit]
//or manual:
//parameters: (64-bit)
//rcx=address of input
xor eax,eax
mov eax,[rcx] //eax now contains the bytes 'input' pointed to
bswap eax //convert to big endian

ret
[/64-bit]

[32-bit]
//jmp dllname.functionname
//or manual:
//parameters: (32-bit)
push ebp
mov ebp,esp
//[ebp+8]=input
//example:
mov eax,[ebp+8] //place the address that contains the bytes into eax
mov eax,[eax] //place the bytes into eax so it's handled as a normal 4 byte value

bswap eax

pop ebp
ret 4
[/32-bit]

//The convert back routine should hold a routine that converts the given integer back to a row of bytes (e.g when the user wats to write a new value)
//function declared as: stdcall void ConvertBackRoutine(int i, unsigned char *output);
ConvertBackRoutine:
//jmp dllname.functionname
//or manual:
[64-bit]
//parameters: (64-bit)
//ecx=input
//rdx=address of output
//example:
bswap ecx //convert the little endian input into a big endian input
mov [rdx],ecx //place the integer the 4 bytes pointed to by rdx

ret
[/64-bit]

[32-bit]
//parameters: (32-bit)
push ebp
mov ebp,esp
//[ebp+8]=input
//[ebp+c]=address of output
//example:
push eax
push ebx
mov eax,[ebp+8] //load the value into eax
mov ebx,[ebp+c] //load the address into ebx

//convert the value to big endian
bswap eax

mov [ebx],eax //write the value into the address
pop ebx
pop eax

pop ebp
ret 8
[/32-bit]
And the same for Float Big Endian
alloc(TypeName,256)
alloc(ByteSize,4)
alloc(ConvertRoutine,1024)
alloc(ConvertBackRoutine,1024)
alloc(UsesFloat,4)
alloc(CallMethod,1)

TypeName:
db 'Float Big Endian',0
ByteSize:
dd 4
UsesFloat:
db 01

ConvertRoutine:
[32-bit]
push ebp
mov ebp,esp
mov eax,[ebp+8] //place the address that contains the bytes into eax
mov eax,[eax]   //place the bytes into eax
bswap eax
pop ebp
ret 4
[/32-bit]

[64-bit]
//rcx=address of input
mov eax,[rcx] //eax now contains the bytes 'input' pointed to
bswap eax
ret
[/64-bit]

ConvertBackRoutine:
[32-bit]
push ebp
mov ebp,esp
//[ebp+8]=input
//[ebp+c]=address of output
push eax
push ebx
mov eax,[ebp+8] //load the value into eax
mov ebx,[ebp+c] //load the address into ebx
bswap eax
mov [ebx],eax //write the value into the address
pop ebx
pop eax

pop ebp
ret 8
[/32-bit]

[64-bit]
//ecx=input
//rdx=address of output
bswap ecx
mov [rdx],ecx //place the integer the 4 bytes pointed to by rdx
ret
[/64-bit]
Once you pressed OK, you are set to go!
But just to be sure, check if your value type has 3 new selections available.
And when you want to scan for values in game, please use their big endian counterpart.